Sunday, 8 April 2018

How to migrate FSMO Roles from Windows Server 2003 to Windows Server 2012/2016


Although Server 2003 has been end of life and in mostly companies people already replaced with updated OS. Last year when i migrated my Servers to new 2012 i made check list and steps to perform all this process which is as under;

Pre-Migration

1)      Backup: Before migration we must test backup in case of any issue facing during or after migration. This backup must be tested in an isolated environment.
2)      Test AD Health: Health test is another component which needs to be done before performing actual migration. AD health can be checked via DCDIAG tool or AD Replication Tool. During this test, DNS functionality will also be tested.
3)      AD Inventory: Other thing to do before migration is need to document Forest and Domain Architecture, FSMO Roles, GC, DNS, IIS, File Server, any GPO, local policy or firewall settings.
4)      Identify Risks: Identify (legacy) applications that have dependency to AD. Further needs to ensure if those applications will work on new Operating System i.e 2012/2016 with new FFL/DFL (2016).
5)      Identify DES enabled accounts: These accounts would not work because DES encryption for Kerberos is disabled by default.
6)      Evaluate new features: Default Domain and DC policy differences, Schema version is updated, Powershell, Administrative Center, AD Recycle Bin, Hyper-V, FRS to DFSR, Advance firewall etc.


First install Windows Server 2012 and configure as Domain Controller of our current domain therefore all the FSMO Roles will be transferred to this server. FSMO roles consists of Relative ID (RID) Master, PDC Emulator, Infrastructure Master Role, Domain Naming Master role and Schema Master. Following are the steps to transfer FSMO roles;

a)       Relative ID Master – after logging in to new installed Server i.e Windows Server 2012/2016 with Domain Admin account open Active Directory Users and Computers. Right click on domain name i.e abc.com in left pane and click on Operations Masters from the menu. A new windows will be appeared having three tabs; RID, PDC and Infrastructure. On each tab displays the current Operations Master for that role. There is also a change button to enable the role transfer.

b)      On the first tab i.e RID click change button, it will prompt yes to transfer or no to cancel. We need to click on “Yes” to transfer the role to the current server. A message window will be appeared for successfully role transferred. Now we can see the current Server is the RID Operations Master. Similarly repeat the above steps for other two role i.e PDC Emulator and Infrastructure Master role to transfer the roles to our current Server which Windows Server 2012/2016.

c)       After transferring the above three roles to our current new installed Server the next step is to transfer remaining two roles also. For this open Active Directory Domains and Trusts and from left pane right click on Active Directory Domains and Trusts. Then click on Operations Masters from the menu and Operations Masters dialog will be opened. This windows is the same above we already worked on but here will transfer the Domain Naming Master role.  We will click on change button to transfer the role to the current Server and click ok to confirm.

d)      Now the last step of role transferring is Schema Master. This is bit different from above roles transferring. We need to logon to Windows Server 2003 SP2 Domain Controller by Admin Account. Click on run dialog box and type regsvr32 schmmgmt.dll and click ok. Actually we need to open MMC and add snap-in dialog i.e Active Directory Schema. In left pane of newly opened MMC window right click on Active Directory Schema. Now click change Domain Controller and specify the name of newly installed Operating System Windows Server 2012/2016 and click ok. Right click the Operations Masters and click change, confirm by clicking yes. Click ok on transfer of successful message box. After this step All five FSMO roles will be transferred to newly installed Server i.e Windows Server 2012/2016 

After transferring roles we have to do Testing and monitoring will on newly installed Domain Controller on Windows Server 2012/2016. After that our old Domain Controller (Windows Server 2003) will be properly demoted by the same command dcpromo i.e Active Directory Installation wizard.

Thursday, 5 April 2018

Active Directory Quick Reference Guide


Q-1: What is Active Directory?
Active Directory is database services which contains all the information of Objects such as Users, Computer, OU, Printers and so on. Its enable Authentication and Authorization for client in domain. It used to manage Centralized Security in network.
Q-2: In which location store Active Directory file?
Ans: %Systemroot%/NDTS/ntds.dit
C:/Windows/NDTS/ntds.dit
Q-3: What is  file name which Active Directory store?
Ans: Ntds.dit
Q-4: Which protocol is used by Active Directory?
Ans: LDAP (Lightweight Directory Access Protocol)
Q-5: How many partitions in Active Directory?
Ans: Schema Partition, Domain Partition, Configuration Partition and Application Partition.
Q-6: How to check FSMO Role in Windows Server?
Ans: Netdom query
Q-7: How many files are create in NTDS folder? Brief describes.
Ans: Ntds.dit: Active Directory database
Edb.chk: The checkpoint file.
Edb*.log: The transaction logs; each 10 megabytes (MB) in size.
Res1.log and Res2.log : Reserved Transaction logs.
Q-8: What is the Sysvol folder?
Sysvol stand for system volume. It contains all information and share folder copy of domain and also Group Policy Security.
Q-9: What is the logical/physical structure of AD environment?
Ans: Physical Structure: Domain Controller and Site
Logical Structure: Domain, Tree, Forest and Organization Unit.
Q-10: How to take backup of Active Directory?
Ans: System State data where all the Active Directory file and information store. Utility for backup Ntbackup and wbadmin.
Q-11: What is stand for DC, CDC, ADC and RODC?
Ans: DC stands for Domain Controller.
CDC stands for Child Domain Controller.
ADC stands for Additional Domain Controller.
RODC stands for Read Only Domain Controller.
Q-12: What is object and example of distinguished name?
Ans: Objects are located within Active Directory Domains according to a hierarchical path, which includes the labels of the Active Directory domain name and each level of container objects. The full path to the object is defined by the distinguished name (also known as a “DN”). The name of the object itself, separate from the path to the object, is defined by the relative distinguished name.
Example: CN=Imran, OU=IT, DC=Test, DC=COM
Q-13: What is OU?
Ans: OU stands for Organization Unit. It is collection for users and group and it give us platform to apply group policy security on users and group.
Q-14: Why do we create OU?
Ans:  OU stands for Organization Unit, it helps to manage user and group according to department and give us platform to implement group policy security according to department. Its make easy to find out user belong which department.

Wednesday, 4 April 2018

Office 365 Groups Settings Wheather people outside organization send email

In office 365 sometimes you need to set that people outside the organization want to send emails to group. This group may be created manually or by migration in Exchange online. By default the option is off but we have to change settings from following path; Go to Office 365 Admin Portal than go to Group section and from right pane choose option "Let people outside your organization send email to this group" button to drag it to right and set as "ON" which is looking "OFF" highlighted in image below;


If you have any query please let me know.


Tuesday, 3 April 2018

How to configure Outlook for Email

In this post we will learn how to configure outlook for email account. I will configure my office 365 account for this purpose.  Please follow the steps below;
Step-1: First of all i click on "Windows" button and than click on "Mail" tab as highlighted in fig below.


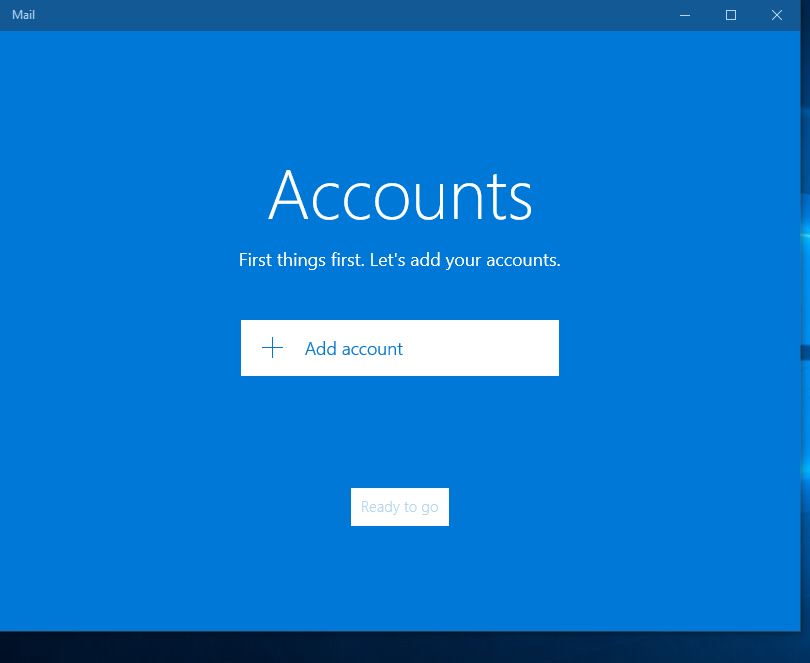
Step-2: In this step I will add account and i click on "Add Account" button showing in fig below.


Step-3: In step-2 when you clicked on "Add Account" a new window will be popped for which you you need to configure. You can see all options hotmail, office365, yahoo, google or any other account which you want to configure. I will choose office365 for which I am going to configure showing in fig below.
Step-4: In this step showing in fig below you have to enter your email address.
Step-5: After entering your email address you need to click on next button and you are done.
Step-6: After clicking "Done" button you will see the message "All done, Your account has been successfully done" showing in fig below.

By following simple steps you can configure your outlook in your desktop. For any query please comment. Thanks